
 |
|
Site: News/Home CNC Guild Forums Submissions Contact Staff Downloads: Voxels: Aircraft Ground Naval Voxel Comp ´06 SHPs: Infantry Buildings Animation Other Icons: Packs Buildings Armored Infantry Maps: RA2 Mp maps RA2 Sp maps YR Mp maps YR Sp maps Other Other: paFileDB GFX Packs TSGFX Packs Tutorials Utilities Mods Sounds Recommended Downloads: Ares |
 |
Wireframe SHPing
Submitted by ArgCmdr
Wireframe SHPing is kind of a new SHPing method, introduced by your informer,
ArgCmdr. Its directed towards those who cannot do 3D design ( in case you
cannot run any 3D design programs like me, or in case you simply cant get
the rid of the design progs). All you need is Paint Shop Pro. Or Photoshop,
though i recommend PSP because its simplier to use for this purpose (everything
needed is more "at hand".
This guide will tell step by step how the Observation Tower (available at
several resource sites: YrArg, Savage War, PixelOps...) was made, pics included.
First off, lets explain what this is all about. A wireframe SHP is a 3D simulation
of a model. Wireframe name comes from the initial constitution method, based
onto simple unfilled lines, which conform fake "polygons". Cubes, for example.
Its like drawing in perspective, except its on your computer.
As we all know, Command & Conquer Series from TS until YR use a 120º perspective
angle, making X Y and Z axis to be all at their same distance, thus you can
consider one of them a straight vertical line and the other two to face an
exact division by 3, coordinate directon. Too complex? Nah, it isnt. The image
below shows perfectly the meaning.
![]()
So,
basically, what we are gonna do is create polygons on a 2D background in 120º
perspective, so called isometric perspective (Iso-metric, greek composed which
means equal-measure).
First you get a paper and design what you are gonna do. There isnt much to
explain on this step. Then you will dump it to your computer. I dont think
instructions are needed to tell how to make a cube on PSP. Use the pencil
tool or the line tool (unless you are used to working with layers, i recommend
using the pencil. Even i find it way more simple. Before continuing, you may
have doubts pointing to the size of your drawing and how complicated it is
to draw it. Well, for the first, size is not a problem unless you plan complex
polygonal work. In that case, id recommend using the grids made by BobingAbout
so you start your work already on scale. In this example, i made the model
300% bigger than output SHP. Simply made for better texturing. And for the
second well...part of making models here is trying to make perspective drawing.
If you cannot understand perspective, dont try, its a waste of time. Practice
on paper instead.
So, a result can be this (notice, in this case perspective is not 100% correct
because its worked out from a finished version of the design, -i erased the
early ones from this HDD-. The point is clear though)
Next
step is coloring the current model. Now this part has two sections. First
is lighting. Second is textures.
For lighting, youll notice the light direction in the game points from isometric
south to north -Yes, its weird enough.- So the right side of the model will
have to be darker than the left. You can do the lighting changes abrupt or
gradual. Both look ok, and in fact gradual is much more complicated and not
worth for the difference. So here we will just go for abrupt. As you can see
anyway, the main body of this SHP has only four fully visible directions (two
more are very narrow due to angles). So whenever you have textured each facing,
you should go selecting each facing and setting its own lighting value. In
this case, the top and the left are same light, middle is a little bit darker
and right is darker considerably ( i cannot recall exact values as the SHP
was made more than two months ago ).
For texturing, is where the cut and paste job starts. Most of you will know
what a texture is but you may be confused on how to apply it to the facing
of a polygon. Well, its simple. Get or make the textures you will like for
the walls, roof and floor of your structures. The internet is actually a big
resource for them, or even SHPs already in the game, like for example, the
bricks used in soviet structures. You get a file. resize it as you see it
fit so according to the 100% size of your model neither the texture will be
unnoticeable or become pixelated. Then you simply copy and paste inside the
facing, including the wire frame line. Its always better to alter between
lighting and texturing, so even if you erase guidelines, you can still see
the polygons because of the lighting mismatches. You may have spotted some
non-usual facings. Oblique to say it clearly. Procedure is easy enough though.
You simply grab the texture (make sure you are working on 16-24 bit colour
first) and you rotate it as you see it fit, according to the angle of the
facing. Then you sharpen it to eliminate the blur it gives as result because
of average calculations of the program to cover nearby "empty" pixels. There
you have it!
So, by now, your structure should be sort of this.
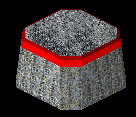
Next
step is pasting in the rest of the design, as you can see, thats a base, yep,
but theres nothing above! You simply repeat the above steps to add something
else to the structure. In this case, its better added with symetry, but for
more complex stuff, you are free to exploit you art capabilities!.
Now, after adding the top part and all that work, this is what it should be.
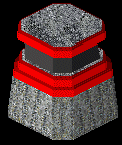
You
will notice theres already a glass effect there, its basically a polygon,
black in this case, with different lighting values with make it closer to
white depending on facing. Not hard at all. Now you need to resize and center,
and on final version, add minor details (for example, a small wall which will
actually contain those glasses, something i missed in the design part)
After resizing, and those final touches above, the result is this:

Simple
design, yet not a lot of work! Shadows are easily made if you can draw on
paper on perspective with ease, and damaged and snow frames are as easy to
do as in a copy paste building. The good thing is, you can plan buildups in
an easier way due to the fact that you have all or almost all the images you
need for it in the development of the main SHP itself.
So there you have it, in summary, how to make a wireframe building. Its short
yes, but it also represents how easy it is to do it.

|
|
Favourites: Ares Mental Omega raminator CnC Sleipnir's Stuff Wagnerma.de Webmaster: Nighthawk Affiliates: CNC Guild Project Perfect Mod CNC Source Sudden Strike C&C Reloaded Revora Frontpage Revora Hosting |

|